Base Editing
Overview
This page provides a guide to using the edit functions of a Super Group base.
Base Editing Selector
The Base editing selector is available in the Entrance Room. When you leave the entrance room, the Base Editing selector is removed (allowing you an unobstructed view of the base). Once you have selected a function of the base editing selector, you may move about the base as desired.
There are several separate functions available on the Base Editing Selector:
- Requires base editing Super Group privileges.
- Permits adding most items to rooms in the base
- Permits adding items linked the character: items crafted at Workshops and Forges, and Veterans Reward base items.
- Requires base editing Super Group privileges.
- Permits
- changing the size of the base as a whole
- adding, moving, and removing rooms
- changing the height of the floor and ceiling of rooms
Upgrade Plot
This option is available to anyone with base editing privileges.
This function permits the editor to change the Base Plot, the area within which rooms can be placed.
- See: Base Plots
A floating box displays the current plot information, and an Item Selection Bar at the bottom lists the base plot choices available. As with all the choice bar displays, selections that cost more prestige than the group has available list their price in red.
Edit Base
This option is available to anyone with base editing privileges. Selecting this option brings up the three main elements of the base editor:
- the Room Overview window,
- the Attribute Editor,
- and the Item Selection Bar.
The Item Selection bar appears at the bottom of the screen, and provides several editing modes:
- This mode permits you to add and remove rooms from the plot, to move existing rooms, and to alter the ceiling and floor levels of individual rooms.
- This mode permits you to select segments of a room and choose styles for it. These include both selecting the pattern for a given segment of the room, and the colors of that segment.
- This mode permits you to place, move, and remove normal items from the plot. Placing personal items requires selecting the "Place Personal Item" editing option.
In addition to these choices, the Item Selection bar also displays a selection of items, dependent upon the current editing mode (rooms, style, items).
Room Overview
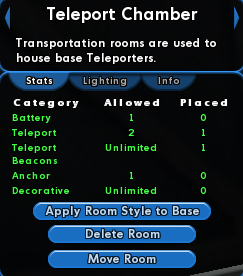
The room overview starts at the top with a description of the selected room.
Using the arrows (on either side of the room description) will change currently selected room and move you to the room in question.
At the bottom of the panel are buttons that allow you to Move or Delete the room, or to apply the current room's style to the base at a whole.
Stats
Displays
- what categories of item can be placed in this room
- how many items of that category are allowed
- how many have been placed.
Lighting
Provides a control allowing you to change the ambient lighting color and strength of a room. Adding in additional lighting items allows you to change the lighting more locally.
Info
Apply Room Style to Base
This button takes all elements of the current room's style elements and applies them to the entire base. See Pick Style for more information.
Creating Rooms
The room selected in the Room Overview will be the Entrance Room. Your view will be zoomed out (to make placing rooms more convenient), but you can change your camera view as normal.
Picking Styles
Placing Items
Related Player Guides
These guides are linked here as a suggested reference material, and like all guides, are the responsibility of their posters to be accurate.
