The Players' Guide to the Cities/Character Slot Management
This article is a stub. You can help the Wiki by expanding it. This article needs:
- screenshots to fill the gaps in the Transfer to Another Server section
- screenshots to fill the gaps in the Renaming a Character section
- expansion of the Purchase a Character Respec Token section
- expansion of the Purchace Mission Architect Story Slots section
At the character selection screen, there are several options available to help you manage your character slots on a server.
Check Name Availability
At the character selection screen, you have the ability to check to see if a character name is already in use on the server you have selected. If you already have a name in mind a new character you want to create or would like to transfer a character from another server to this one, you can make sure that the name is available by clicking the "Check Name" button at the bottom of the character slots.
Clicking on the "Check Name" button will bring up a window in the middle of the screen where you may type a the name you wish to check for. After typing in the name, click on "OK". If the name is not already being used by another player on this server, you will get a message that states the name is not currently in use. Otherwise, you will be informed that someone on this server is already using the name you have selected.
Clicking on the "Cancel" button in the name prompt or the "OK" button in either of the confirmation windows will close the window and return you to the character selection screen.
Create a Character
This is probably the option most frequently used by players. You can begin character creation by clicking on any empty character slot that says "Create Character".
There are several steps in the character creation process. This process is covered in detail here:
Sort Characters
You can change the order in which the characters in your list are displayed by clicking and dragging the character slots around. Dragging a slot from one location to another will cause it to trade places with any character slot that was previously in that position. You may drag a slot to the right or left to move it from one page of characters to another.
Delete a Character
Should you decide at some point that you wish to delete a character, you may do so by first selecting the character on the character selection screen. After selecting the character, click the red "Delete" button in the upper right corner of the screen. You will then be prompted to enter the name of the character for deletion to confirm your request. In order to continue, enter your character's name exactly as it appears and click "OK". The character will then be deleted from your server and the slot previously occupied by that character will be emptied. If you change your mind and do not wish to delete the character, click on the "Cancel" button and you will be returned to the character selection screen.
Redeem a Character Slot
If you have any extra character slots available on a server, there will be an extra button at the bottom of your character list labeled "Redeem Slot". This will also display the number of extra slots that may currently be redeemed on this server. Click here to redeem a character slot on your selected server.
Before your character slot is added to the server you selected, you will be presented with a confirmation dialogue. Click "Accept" to confirm that you wish to redeem your character slot. Clicking "Cancel" will send you back to the character slot management screen without redeeming your slot.
Character Management Store
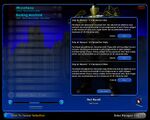
From the character slot management screen, you may enter the character management store. In the store, you will have the option of paying to unlock additional character slots on your current server, purchasing a respec token for your currently selected character, or purchasing additional Mission Architect story slots for your account.
You may enter the store by clicking on the button in the lower right corner of the character selection screen. The button appears as either a red briefcase with an Arachnos logo on the villain themed screen or as a blue briefcase with a star on the hero themed screen. (Although the buttons appear differently on the two screens, they function identically and work the same for both heroes and villains.)
You may exit the store at any time by clicking the "Exit Store" button at the bottom of the window.
Transfer a Character to Another Server
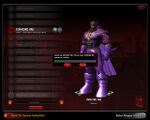
Should you decide that you would like to transfer an existing character from one server to another, you may purchase a server transfer for a character. Transfers may be purchased by selecting your character for transfer and clicking on the "Buy Server Transfer" button at the bottom of the right half of the character selection screen.
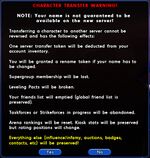
Clicking on this button will display a warning message. You will be reminded of the following:
- The name of this character may not be available on your destination server.
- You will be granted a free rename token to use on this character if your name has to be changed.
- Any membership you currently hold in a supergroup on your current server will be lost.
- Your local friends list will be purged.
- If you are currently taking part in any Taskforce or Strikeforce, your progress will be lost.
- Your arena ranking will be reset.
- All influence/infamy (as well as personal inventories and auction transactions), badges, contacts, etc. will be preserved.
- Server transfers can not be refunded once purchased.
To cancel the transaction and return to the character selection screen, click the "Cancel" button.
To continue, click the "OK" button. This will bring up the server destination window.
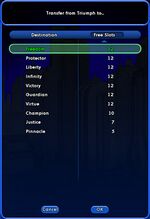
The server destination window displays a list of servers to available as a destination for your transfer and the number of available character slots you have on each server. Clicking the "Cancel" will cancel the transfer and return you to the character selection screen. To continue with your transfer, select the server you wish to transfer your character to and click the "OK" button.
Before your transfer is completed, you will be prompted for a security authorization.
If you do not have a credit card on file, you will see a message stating that you are not able to make a purchase. (Information on adding a credit card to your account may be found at the PlayNC Support Center.)
If you have a credit card on file in your PlayNC account information, you may proceed by entering your password in the security authorization window. And clicking on the "OK" button.
You may cancel your transaction and return to the character selection screen by clicking on the "Cancel" button.
You will now be shown a final purchase confirmation window. This window will display the source and destination servers for your transfer as well as the name of the character being transferred. You will also be shown billing information such as the base price of the transfer, any applicable sales tax, and the final amount that will be charged to your credit card. This is your final opportunity to cancel your transaction. Should you wish to cancel, click the "Cancel Order" button to return to the character selection screen. Clicking on the "Charge My Card" button will authorize PlayNC to charge your credit card for the transfer fee and begin your transfer.
After authorizing the charge to your credit card, you will see a message stating that your purchase has been requested and it may take a short time to complete the transfer.
When your transfer is complete, you will receive a final confirmation message.
The cost of a character transfer is $9.99 USD (£5.99 GBP) and the token is only good for one transfer in one direction (as an example from Justice to Freedom). If an additional transfer is required you will need to pay a second fee.
More information on the character transfer process can be found here:
EDITOR'S NOTE: Information taken mostly from the Character Transfer tutorial at the official City of Heroes web site. May need to be verified for current accuracy.
Rename a Character
You may rename a character if you have any Rename Tokens available. A Rename Token may be purchased for a character by selecting the character you wish to rename and clicking the "Buy Rename Token" button in the lower portion of the right half of the character selection screen.
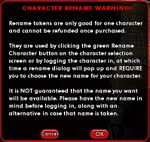
Clicking on this button will display a warning message. You will be reminded of the following:
- Rename tokens are good for only one character and can not be refunded once purchased.
- Characters may be renamed by clicking on the green "Rename Character" button after purchasing a token.
- Logging a character in after purchasing a rename token will require you to rename the character before entering the game.
- The new name you want may not be available on your server.
To cancel the transaction and return to the character selection screen, click the "Cancel" button.
To continue, click the "OK" button.
Before your purchase can be completed, you will be prompted for a security authorization.
If you do not have a credit card on file, you will see a message stating that you are not able to make a purchase. (Information on adding a credit card to your account may be found at the PlayNC Support Center.)
If you have a credit card on file in your PlayNC account information, you may proceed by entering your password in the security authorization window. And clicking on the "OK" button.
You may cancel your transaction and return to the character selection screen by clicking on the "Cancel" button.
You will now be shown a final purchase confirmation window. This window will display the purpose of your transaction (purchasing a Rename Token) as well as the current name of the character you will be renaming. You will also be shown billing information such as the base price of the token, any applicable sales tax, and the final amount that will be charged to your credit card. This is your final opportunity to cancel your transaction. Should you wish to cancel, click the "Cancel Order" button to return to the character selection screen. Clicking on the "Charge My Card" button will authorize PlayNC to charge your credit card for the rename fee and initiate your transaction.
After authorizing the charge to your credit card, you will see a message stating that your purchase has been requested and it may take a short time to complete the transaction.
When your transaction is complete, you will receive a final confirmation message.
Upon returning to your character selection screen, you will now find that the "Buy Rename Token" button has been replaced by a green "Rename Character" button when the character you purchased the token for is selected. Click this button to rename your character.
You will now be prompted to enter your character's new name.
If you attempt to enter a name that is already in use, you will receive an error message.
If your rename is successful, you will receive a confirmation message.
Alternately, you may select a character with a Rename Token and select the "Enter Paragon City" or "Enter the Rogue Isle" button. This will prompt you to enter the new name of your character. Again, you will receive an error message if you have selected a name already in use. If your rename is a success, you will receive a confirmation message in your chat window via the System channel.
Rename Tokens can be purchased for a one-time fee of $9.99 USD (£5.99 GBP) and allow you to change the name of one character.
More information on the character rename process can be found here:
EDITOR'S NOTE: Information taken mostly from the Character Rename tutorial at the official City of Heroes web site. May need to be verified for current accuracy.
Purchase Extra Character Slots
After entering the character management store, you may select the number of additional character slots you wish to purchase. You may select a single slot for purchase or you may purchase multiple slots at one time with a small discount for a larger volume purchase.
Keep in mind when purchasing slots that the maximum number of slots allowed on any one server is 36.
A single slot purchase can be made for $5.99 USD (£3.49 GBP), two slots cost $9.99 USD (£5.99 GBP), and five slots costs $19.99 USD (£11.99 GBP).
Purchase a Character Respec Token
If you should decide at some point that you wish to respec your character, in addition to the option of using free tokens or earning a token through a Respec Trial, you also have the option of purchasing a respec token for your character.
Begin by selecting the character you with to respec and entering the store on the character slot management screen. Scroll down until you find the "Character Respec" option and click the "Buy" button.
Need to expand process of purchasing character respec tokens.
Purchase Mission Architect Story Slots
In the character management store, you may also purchase slots for the Mission Architect. These slots will be added to the three every account gets for free.
Begin by selecting the amount of slots you wish to purchase. You may select a single slot for purchase or you may purchase multiple slots at one time with a small discount for a larger volume purchase.
Need to expand process of purchasing story slots.
< Back to The Players' Guide to the Cities

